


This ‘Ascot’ street tracker exhaust system ( 07-0752 ) is designed to give your XS650 that street tracker look, while offering a slight upgrade in performance. The 42mm headpipes ( 1.5″ ID ) are perfectly matched with mufflers with OEM-type internals for that sweet, unrivaled sound. The all-inclusive kit is beautifully chrome-plated with complete mounting brackets and hardware.
Fitment: 1974 – 1979 Yamaha XS650 “Standard” models
Installation Instructions
1. Do not install this system without first having your bike tuned and running properly in its existing configuration.
A) 1974 – 1979 XS650 “Standard” models have Mikuni BS38 CV carbs installed as the stock original carburetors. We recommend that the stock jetting or richer jetting be used, especially if there have been other modifications done to the motorcycle, such as aftermarket pod air filters installed. Again, the final tuning should be done by someone who knows how to tune and read spark plugs.
Stock jetting for 1974 – 1979 XS / TX650 models with stock 38mm Mikuni CV Carburetors are listed below:
Main Jet ( Mikuni N102/221 – Small Round Type )
#127.5 for TX650A / XS650B (1974 – 1975)
#122.5 for XS650C / D (1976 – 1977)
#135 for XS650E / SE / F / SF / 2F (1978 – 1979)
Pilot Jet ( Mikuni BS30/96 )
#45 for TX650A / XS650B (1974 – 1975)
Pilot Jet ( Mikuni VM22/210 )
#25 for XS650C / D (1976 – 1977)
#27.5 for XS650E (1978) and XS650F (1979)
2. Remove the old exhaust system and gaskets from the cylinder head ports, as well as the rider footrests and passenger pegs.
3. Unpack the new 07-0751 exhaust system. Examine, wax and polish the chrome mufflers and headpipes.
4. A hardware kit is included with your Exhaust system and is packed with related parts in sequence.

5. “Standard” models have a passenger peg frame loop.

6. Install the new headpipes, cylinder head port gaskets and headpipe flange crown nuts and lockwashers (HDW Ref. A). Tighten but leave just loose enough that the head pipe will still rotate in the head. Note: there is always an even
gap between the finned headclamp and the head.
7. When installing the left ( inner ) headpipe, hold it firmly against the side of the lower part of the frame and then lightly tighten the head flange nuts.
8. The Ascot headpipes are now installed, as pictured below.

9. Mark a line on the top headpipe 1-5/8″ away from the end of the pipe. Mark a line on the bottom headpipe 2-5/8″ from the end.

10. Muffler support bracket (HDW Ref. D) mounts to the right side passenger footrest mount stud. The passenger footpeg mounts to the same stud and uses the one shown for the right-hand side.
11. Check the footrest fit, as it may be necessary to bend or flatten the right-side footrest locktab.
12. Remove the slider bracket hanger straps included with the ascot mufflers and discard.
13. Slip the lower muffler onto the headpipe up to the mark you placed on the headpipe. Insert the head of the short bolt provided (HDW Ref. E) into the mufflers slider bracket and through the black hanger strap as shown. Install nut and washers, hand tighten the nut.
14. Install the other passenger footrest onto the other (left) side of the bike using the crown nut and lockwasher (HDW Ref. 8) provided. Tighten.
15. Slip the upper muffler onto the headpipe up to the mark you placed on the headpipe. Insert the head of the longer bolt provided (HDW Ref. E) into the muffler slider bracket. Slide the thick washer on to the bolt as shown and push the bolt through the black hanger strap. Install washers and nut. Hand tighten the nut.
16. Check that the mufflers are positioned like this (relative to each other and to the shocks) and adjust them as necessary.

17. Mounted mufflers, nuts, washers, and spacers should look like this when assembled. Due to differences in frames, it may be necessary to use additional upper muffler spacers if you cannot get the final muffler & headpipe alignment correct.

18. Push in firmly at the point shown and hold the outer head pipe in against the frame. Evenly tighten the cylinder head flange crown nuts (both flanges) while holding the head pipes in.
19. Tighten the muffler clamps and the hanger/slider brackets. It may be necessary to hold the upper or lower muffler in position while tightening. The following frames show the ideal final muffler positions and clearance from the rear axle, shocks and lower shock mount bolt. If the alignment is not correct, loosen the mufflers, adjust the spacers, and try again. The headpipes must be pushed in together against the frame to end up with enough room for the kickstarter to kick through.

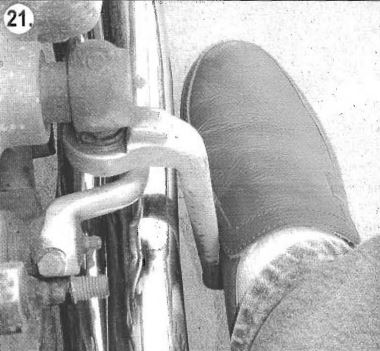
22. Re-install the rider footrests and check the rear brake adjustment and the travel of the brake pedal to be sure it does not hit the head pipe.
23. Wipe down the entire exhaust system and remove all dirt, oil, and fingerprints from it before starting or these will embed in the chrome plating once the exhaust is hot.
25. Start the bike and let it warm up a few minutes. Check for any exhaust leaks and adjust the idle speed as needed. Shut off the engine and re-tighten the system mounting fasteners.
26. Roadtest, adjust jetting and idle as necessary and retighten all fasteners again. Enjoy!
WARNING! Do not ride with bare legs, this system can get very HOT! HOT! HOT!

You have now installed the Ascot Exhaust System for ‘Standard’ models.
For tech support, contact us at customerservice@mikesxs.net